1
Understanding 360-degree video
What is a 360-degree video? How is it different from conventional video that we are all familiar with?
The notion of 360-degree video refers to the spherical panoramic video, that is created by stitching video footage from two or more wide-angle lenses of a 360-degree video camera. The lenses of these special cameras are designed to be facing in enough directions to capture the entire scene simultaneously. The difference between a frame from a conventional video and an unwrapped frame from a 360-degree video is shown in Figure 1.
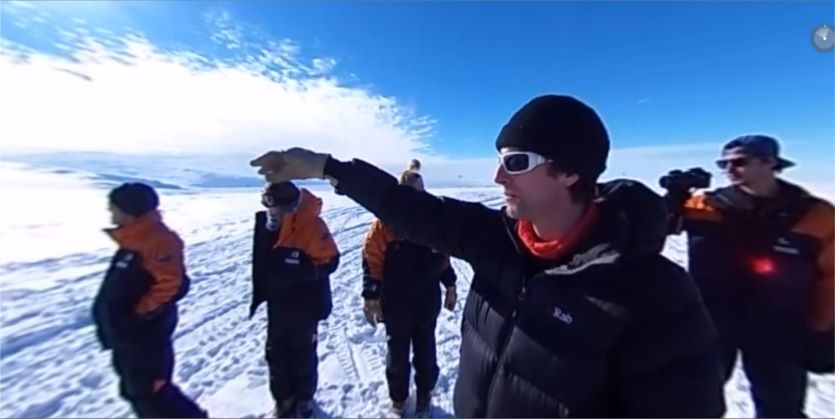
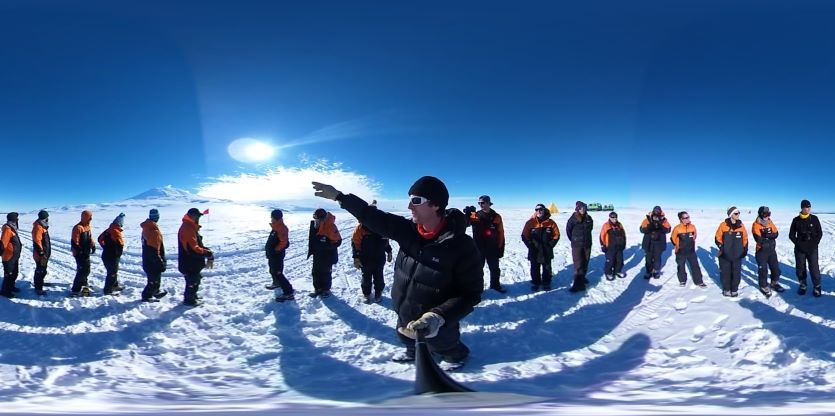
Figure 1. Comparison between a conventional video and a 360-degree video; (a) A frame from a conventional video; (b) An unwrapped frame from a 360-degree video.
To watch a 360-degree video, there are three ways:
- On a mobile device, the viewer can either use a finger to pan and look around, or directly point the device to where the viewer wants to look.
- On a desktop PC, the viewer can use the mouse to pan and look around.
- In a virtual reality (VR) headset, the viewer is virtually wrapped by the video and can simply look around as it is in real life, by moving their head.
The major characteristic of a 360-degree video is its ability to capture the entire scene simultaneously, enabling an immersive experience for the viewer.
When should I use this 360-degree video?
The 360-degree video is best for creating a sense of being transported to a new or important place, and having an immersive experience, as opposed to just watching something or being informed about something. It emphasizes the experience of being at a location together with the presenter. Here are some exemplary user scenarios in which 360-degree videos are preferred, and in which user scenarios conventional videos might be good enough.
Exemplary user scenarios in which 360-degree videos might be preferred:
- Joining a safety induction with Professor Jackson in the biology laboratory
- Standing on the rim of the gigantic crater of a volcano with Ben Kennedy
Exemplary user scenarios in which conventional videos might be good enough:
- Introducing the personal protective equipment (PPE) to wear in the laboratory
- Showing the textures of the aa rocks found near the crater

2
Getting prepared before shooting
Preparation is quite important for shooting 360-degree videos. Most of the 360-degree video cameras do not support in-camera live viewing like conventional video cameras do, so it will be difficult to notice if there is something wrong until the footage is exported and viewed on a computer after the shooting.
Know your shooting location well
Carefully evaluate the shooting location before you start, because the viewer will be fully immersed and free to look around, rather than only looking at what you want to show them. If you are new to 360-degree video production, we recommend you start by shooting at only one location at a time. Inspect the shooting site, and be aware of the following elements:
- Landscape: Is it indoors or outdoors? What’s around the shooting spot, in the near and far distance?
- Interesting locations: Where are the potential locations for the camera and the presenter in order to see the content well?
- Crowd control: Will there be people passing by and looking at you and the camera out of curiosity?
- Ambient noise: Can ambient noise (e.g., wind, people talking, machine noises, etc.) be controlled?
- Lighting: Is natural lighting enough? Is artificial lighting needed? If it is, remember the lighting equipment will be captured in the 360-degree video footage.
Make shooting plans
Answering these questions can help you quickly plan your shooting;
- Where will the camera be?
- Where will the presenter be?
- What will the presenter talk about? A short script for a more manageable 5 – 7 minute video could ease the shooting stress a lot.
- Where will other people (e.g., members of the production team) be in the scene? Do they need to somehow hide from the camera?
- Where will the important things (your Regions of Interest, or ROIs) be relative to the camera? This will affect how the presenter talks about them. If they are small, the presenter can go and pick them up for showing in front of the camera. If they are large and stationary, the presenter will need to be mobile. Moreover, how are they physically located? If they are scattered, the camera might need to be moved to cover all of them.
Get familiar with your equipment
First things first, you should get familiar with your particular camera before shooting. Look at this detailed camera instruction if you are using the Insta360 ONE X. Other guides will be provided here once they are created.
Prepare a tripod, a monopod, or a selfie stick to properly mount the camera, so that the camera can be kept steady at the eye level of the main presenter.
Understand how audio will be recorded. All 360-degree video cameras come with built-in microphones. These will be sufficient for most cases. The audio will be recorded along with the video and will not require any special post-processing. In some cases when there is a lot of ambient noise (e.g., wind, people talking, machine noise, etc.), additional audio-capture devices may be necessary. Please see the section on Advanced Audio for more information.

3
The Shooting Day – What to do
It is always good to do some preparation on the shooting day, before rolling the camera. 360-degree videos are mostly one long take with no cuts, so getting familiar with the scene will make the process smooth. Stand at or walk around the place you are going to shoot the video. Rehearse the content according to the objects in the scene (ROIs) and get familiar with your script.
At the scene 1 – It’s all about the camera
To place the camera properly, follow these guidelines:
- Think of the camera as a person you are speaking with or to show things to. Place the camera where people normally would sit or stand when being talked to, having a lecture, or joining a lab tour, etc. (refer to this part for more details about placement).
- Make sure the camera is roughly at the presenter’s eye height. (see Figure 2)
- If there will be multiple presenters, arrange them in a semi-circle, and place the camera among them somewhere on the edge of the semi-circle. DO NOT put the camera at the centre of the semi-circle. This is because if you think of the camera as a person, the person will most likely feel uncomfortable standing at the centre of a ring of other people.
- Keep the camera at a “normal” social distance; 1 meter might feel too close and 1.5 to 2 meters may be more appropriate (see Figure 2).
- Remember that the camera does NOT need to be deliberately pointed at things since everything will be in the shot. But, you will need to make sure the ROIs are both visible and close enough for the viewer to make out the required detail.
- Mind the default “front” of the camera, so the viewing experience will begin with the “action” in front of the viewer. The default front varies with different camera models, refer to the camera instruction page, or the user manual for details. (also see Figure 3 (a))
- Avoid putting important things at the “seams” where the lenses’ fields of view meet, because the images at the seams will be partially cropped during export. For 360-degree video cameras with two ultra wide-angle lenses (e.g., the Insta360 ONE X, GoPro Max, etc.), the seams will be at the two sides of the camera (see Figure 3 (b)).
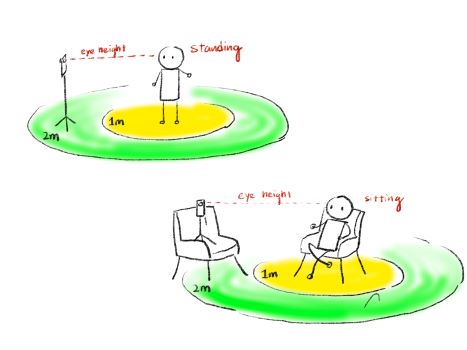
Figure 2. Recommended placement of the camera
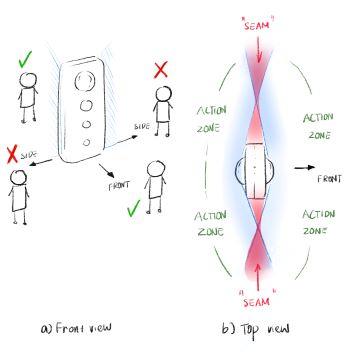
Figure 3. The front, back, sides of a camera (ONE X, in this example), and the “seams”. (a) A front view of the 360-degree camera, stand in the front and back of the camera for best capture qualities. (b) “seams” (the red zone) are formed where the FOV (the blue shades) of two lenses meet on the side, avoid the seams when capturing. Use the “action zones” instead.

Figure 4. Camera rotation and mounting the camera to a selfie stick; (a) and (b) the camera is not required to be held upright; (c) if the camera is kept upright and mounted on a selfie stick, the selfie stick will be visible in the final 360-degree video footage; (d) the recommended way of mounting the camera to a selfie stick.
Although a steady camera pose is recommended for most scenarios, as it will lead to a comfortable viewing experience, in some cases you might want to move the camera while capturing. We recommend to keep the following in mind:
- When moving the camera while capturing, use the selfie stick or the tripod but DO NOT hold the camera body directly, otherwise the viewer will feel like his or her head is being held in someone’s hand.
- Make sure to keep the camera at the presenter’s eye height while moving.
- Add context to the movement. The presenter can say “let us walk over there” or “let me show you over there” before moving the camera.
- Move the camera as smoothly and gently as possible in a roughly straight line. Avoid rapid rotations or other sudden movements.
- Holding the camera upright is NOT required or recommended (see Figure 4 (a) and (c)).
- Mounting the camera in a line with the selfie stick is highly recommended (see Figure 4 (b) and (d)); it helps to make the selfie stick invisible, and to compensate for bobbing while walking.
- Most cameras today have very good stabilization capability, so smooth walking will not introduce too much shaking.
- Give a short pause after a long movement, so the viewer can have some time to look around and familiarise with the new location.
At the scene 2 – The Triangle of the storyteller, the camera and the ROI
In 360-degree video production, the locations of the camera, the presenter, and the region of interest (ROI) naturally form a triangle (see Figure 4), which affects the viewer’s perception of his or her location in the scene, the relationship with the presenter, and the comfort of seeing both the presenter and the ROI.
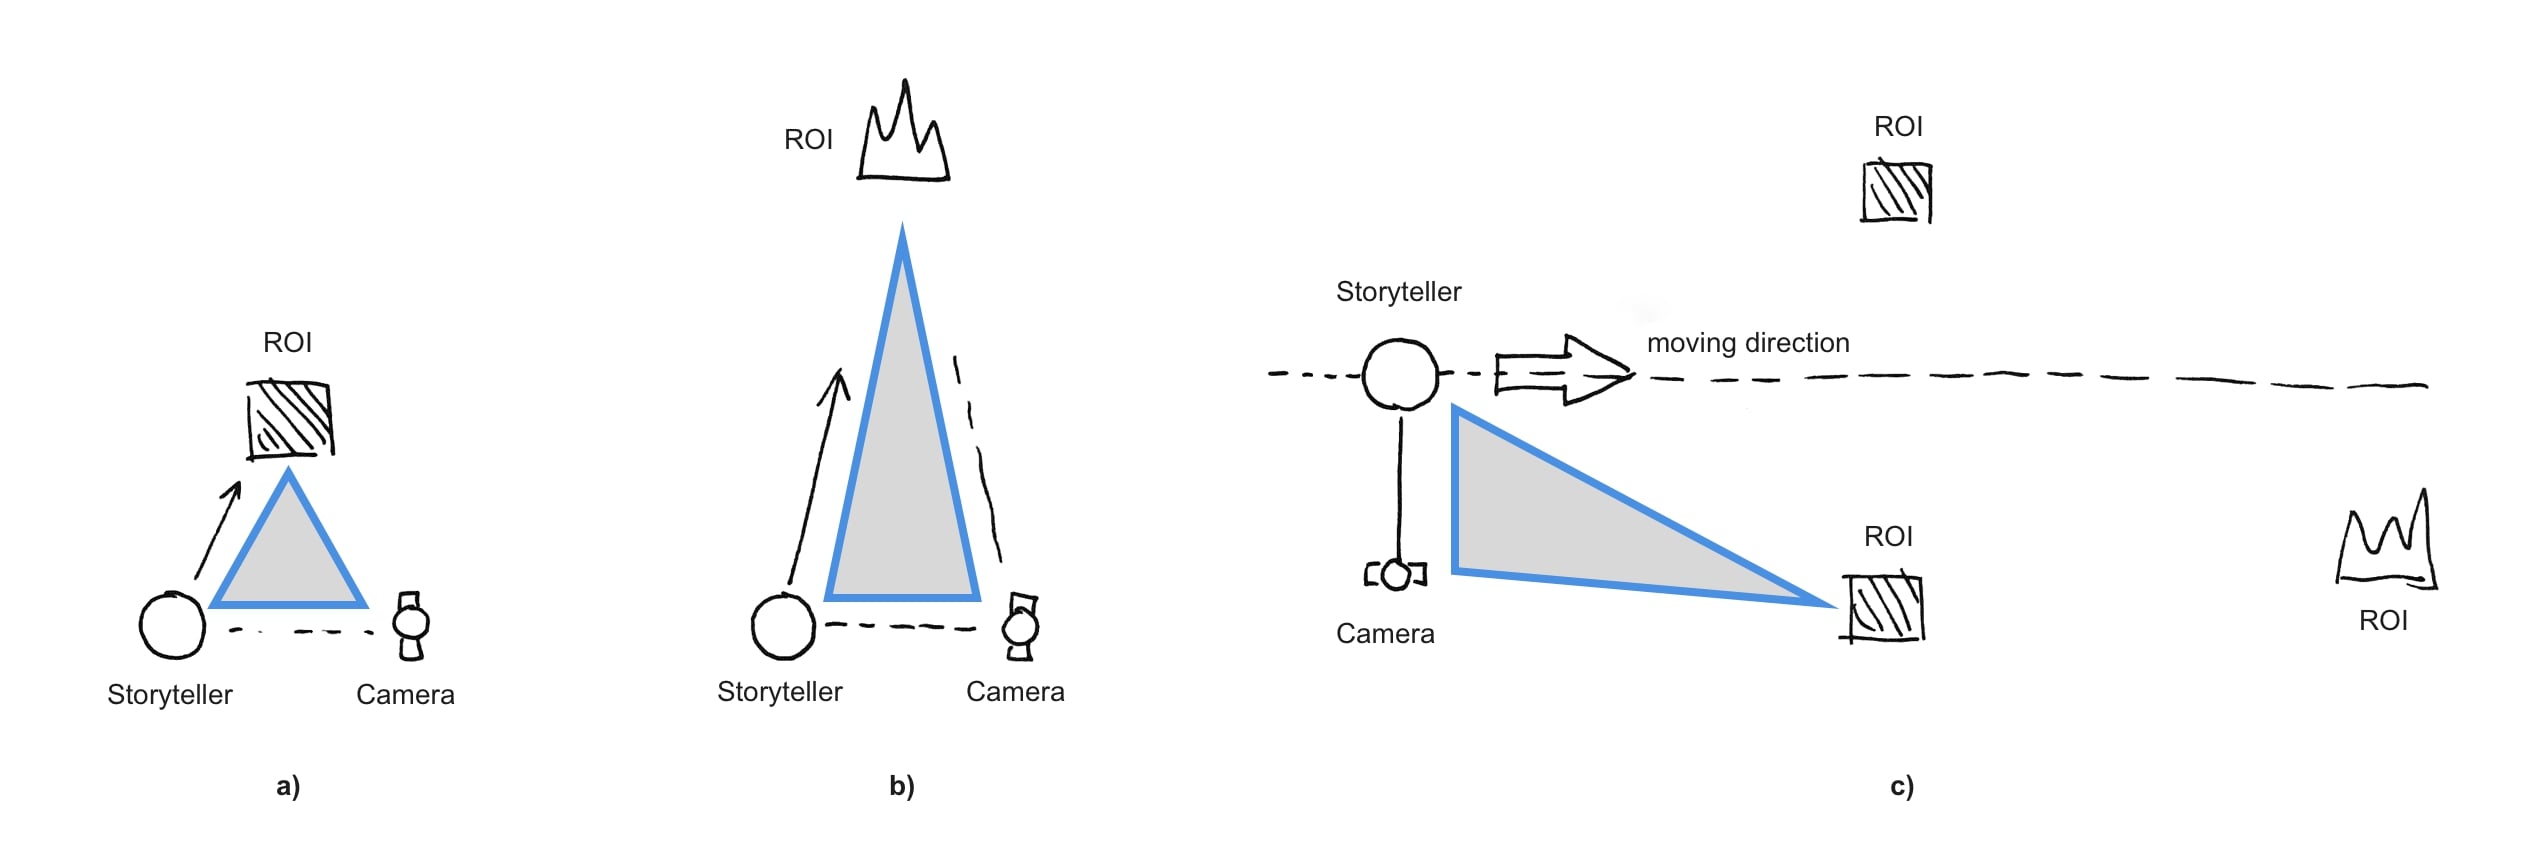
Figure 5. The “Triangle Rules” of the camera, the presenter, and the region of interest, when there is one presenter only
The following recommendations are called the “Triangle Rules”, which serve as a practical reference.
-
The presenter will need to mind the distance to the ROI (close-by or distant) and the camera’s mobility (moving or stationary).
-
When the camera is stationary and the ROI is close-by, the presenter is recommended to keep a normal social distance (i.e., 1.5 to 2 meters) to the camera and to stand within reachable distance to the ROI (see Figure 5 (a)).
-
When the ROI is far away, the presenter is recommended to choose a location so that both the presenter and the ROI can be seen by the viewer without the need of intensive head movement (see Figure 5 (b)).
-
If the presenter needs to move, such as walking along a path to describe several ROIs, the camera should be moved at the same speed of the presenter and on one side of the moving direction all the time (see Figure 5(c)).
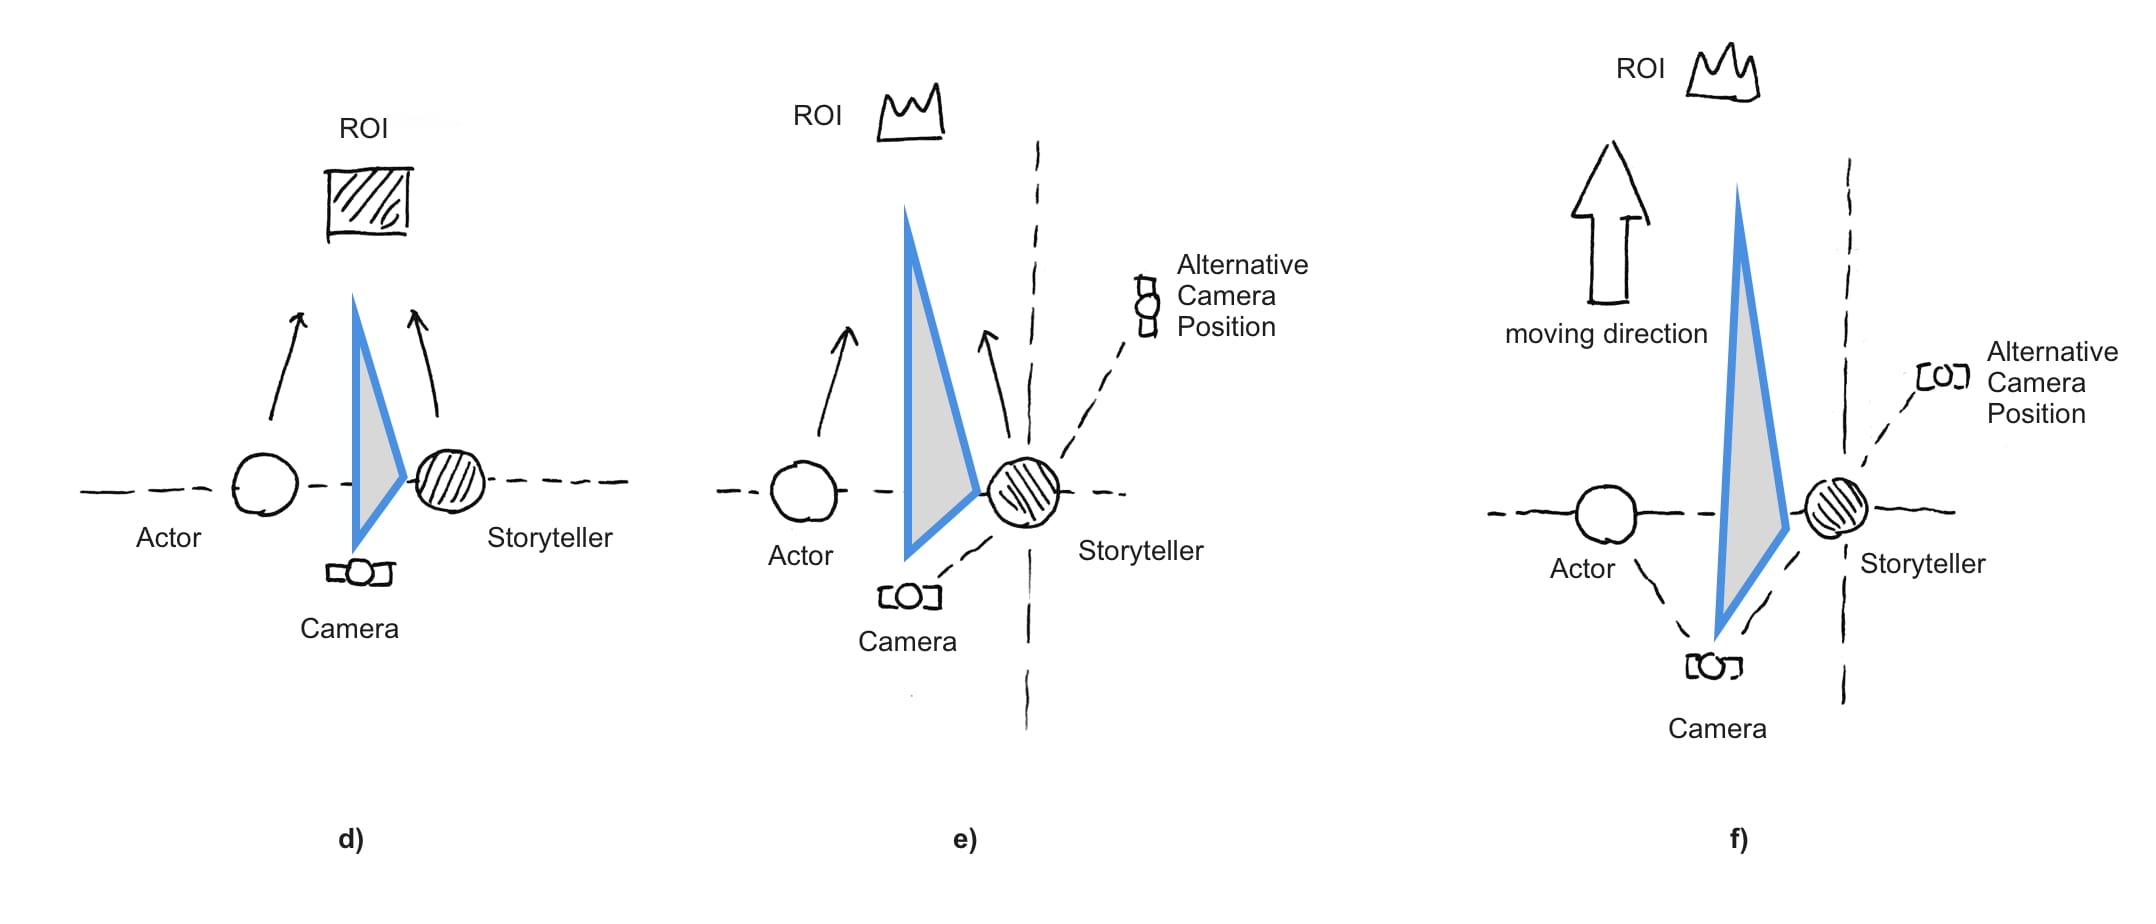
Figure 6. The “Triangle Rules” of the camera, the presenter, and the region of interest, when there are other actors in the scene
If there is more than just the presenter in the scene, other audience members (e.g., actors) can choose their own locations to stand by referring to the following rules:
-
When the actors and the camera are stationary, the actors are recommended to stand on the same side of the camera with the presenter so the viewer can see them all (see Figure 6 (d) and (e)). The actors can face the ROI, either nearby (see Figure 6 (d)) or at a distance (see Figure 6 (d)).
-
If the group is moving, the camera should be move together with the actors while being kept at a location where all actors and the ROI are visible within a comfortable field of view (see Figure 6 (f)). It should be noted that when the ROI is distant, the group formation leaves two possible locations for the camera; the camera can be placed either behind the line connecting the presenter and other members, or on the side of the group (the marked “alternative camera position” in Figure 6 (e) and 6 (f)).

4
Have a natural conversation
Use social cues to make the 360-degree video more like face-to-face conversation
Since it is an immersive experience, viewers of 360-degree videos will find themselves as if with the presenter in the scene. Hence, they expect the presenter to “acknowledge” their existence. If the presenter does so, the viewers will feel a higher level of presence, and find the content more enjoyable. To achieve this, there are two shot types, namely the “look-at-this” shot and “look-over-there” shot, that can be very useful.
The “Look-at-this” shot
When the presenter needs to introduce something small, rather than pull the camera close to the object, he may move the object closer to the camera (see Video 1). The viewer will feel like the presenter picks up the object and shows it closely so that the details can be examined clearly. Remember, this is the way you would probably do it if you were showing something to an actual person.
Video 1. Professor Rob Lindeman of HIT Lab NZ demonstrates the “look-at-this” shot.
Also notice this is a 360-degree video, so drag over the video with mouse to look around
The “Look-over-there” shot
When the presenter needs to introduce an object nearby or at far, he or she may start by looking at the camera, then pointing at the object and looking in the same direction, then look back at the camera while still pointing at the object. These are typical movements we use in normal conversation in daily life (see Video 2). This helps the viewer to follow along with the narrative and notice the object smoothly.
Video 2. Professor Rob Lindeman of HIT Lab NZ demonstrates the “look-over-there” shot.
So, now you should have learned what 360-degree video is, how they are made, and how people will be viewing them. We have also discussed where this technology might be best used. When you are about to use 360-degree videos in your projects, remember to plan ahead and learn a lot about your scene and content. These tips for camera handling and scene management will also help you have a smooth and nice shooting day.
